Keyboard Field Prompt
I've been spending more time recently answering people's Swift and iOS questions and it's been rewarding (for the most part). I'm also a huge advocate for people owning the content they create. For those two reasons, I'm starting a blog series where I post a question and then answer it in-depth the best I can.
Today's question comes from Michael12390 on Reddit. I'm writing the question in my own words for clarity.
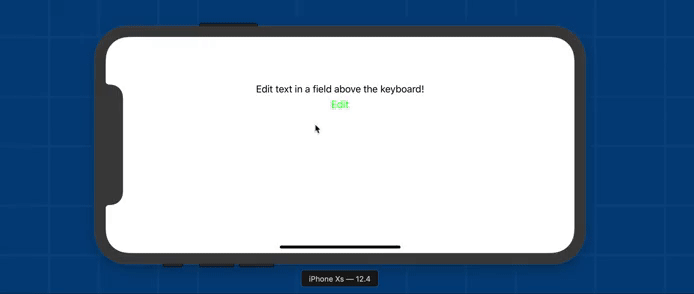
How do I display a text field directly above the keyboard to prompt the user for some text?
I'm going to do more than just provide a solution. I will walk through my thought process as I tackle the problem which will include some lessons I learned earlier on in my development career through a lot of trial and error.
Just in case you're super impatient, you can also browse or download final solution right now.
High Level Plan
For this solution, I wanted to stick as much as possible to a standard UIKit interface. That means, I'm going to create a UIViewController subclass that can be presented similar to an alert with UIAlertController.
This view controller will be presented above the current interface and position a UITextField directly above the keyboard.
Starter Project
To get you started quickly to walk through the coding process with me, I created a starter project.
If you open it up, it contains a few important things:
KeyboardFieldPromptController.swiftwhere we will be doing the majority of our coding.ViewController.swiftthat allows us to test presenting our new controller. It includes a single label with a button to edit the label.
It also contains a couple helper files:
ConstraintFactory.swiftthat allows us to create constraints that are a bit more readableKeyboardConstraintAdjuster.swiftthat will lock a constraint to the height of the keyboard
Both of these helpers are outside of the scope of this blog post.
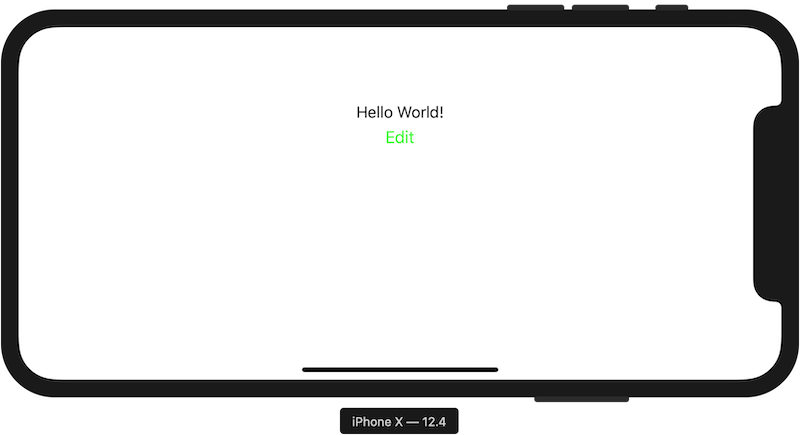
If you run the code now, pressing the “Edit” button will blacken out the screen with our unimplemented overlay.
Setting Up The View Controller
First, I want to start with a simple overlay view controller.
class KeyboardFieldPromptController: UIViewController {
    init() {
        super.init(nibName: nil, bundle: nil)

        // Present over the current screen with a cross dissolve
       self.modalPresentationStyle = .overFullScreen
        self.modalTransitionStyle = .crossDissolve
    }

    override func viewDidLoad() {
        super.viewDidLoad()

        // Slightly darken the content it is overlaying
        self.view.backgroundColor = UIColor(white: 0, alpha: 0.2)
    }
}
This controller expects to be presented modally and ensures that it displays over the current view.
Before I test it out, I wanted to make sure we can dismiss the view controller after I present it. It's good practice to allow the user to tap anywhere on the content below to dismiss this overlay. For that, I'll use a tap gesture recognizer.
override func viewDidLoad() {
    // ...

    let recognizer = UITapGestureRecognizer(
        target: self,
        action: #selector(tapToDismiss)
    )
    self.view.addGestureRecognizer(recognizer)
}

@objc func tapToDismiss() {
    self.dismiss(animated: true, completion: nil)
}
Here, I set up the gesture recognizer and set its action to a method called tapToDismiss. I had to mark the method with @objc so that it can be targeted by the Objective-C based gesture recognizer. Now, whenever the user taps on the darkened background, this controller will be dismissed.
At this point, I want to try out what I have so far by updating ViewController.swift.
func edit() {
    let prompt = KeyboardFieldPromptController()
    self.present(prompt, animated: true, completion: nil)
}
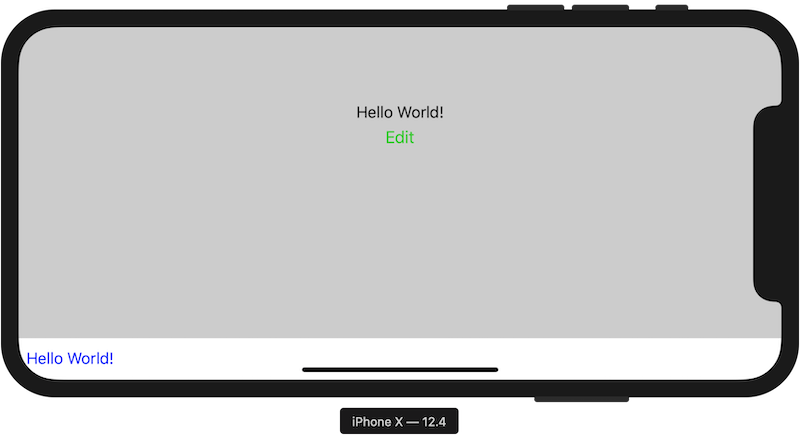
So far so good. It darkens out the screen when I tap “Edit” and then it goes back to normal if I tap anywhere.
Adding a Text Field
The next step is to add the text field. Most importantly, I want to return the entered text to presenter when the user taps the return key. I also want to make sure that the text field is configurable from the prompt site. For this, I need to modify the initializer with a couple closure parameter.
class KeyboardFieldPromptController: UIViewController {
    let textField = UITextField()

    let completion: (String) -> ()
    let configure: (UITextField) -> ()

    init(
        configure: @escaping (UITextField) -> () = { _ in },
        completion: @escaping (String) -> ()
        )
    {
        self.completion = completion
        self.configure = configure

        // ...
    }
}
I'm not calling the configure closure immediately in the initializer because I want to provide some reasonable defaults first. We'll do that in viewDidLoad.
override func viewDidLoad() {
    super.viewDidLoad()

    self.textField.returnKeyType = .done
    self.textField.delegate = self
    self.configure(self.textField)

    // ...
}
The most important thing here is that I set the delegate of the text field to the controller itself. This is so that I can detect when the user presses enter. Let's do that now.
I only needed to implement a single method of UITextFieldDelegate. textFieldShouldReturn(:) is called any time the user taps the return key.
extension KeyboardFieldPromptController: UITextFieldDelegate {
    func textFieldShouldReturn(_ textField: UITextField) -> Bool {
        self.tapToDismiss()
        self.completion(textField.text ?? "")
        return false
    }
}
First I initiate the dismissal of the view and then I call the completion closure with the current text in the text field.
Ok, I've got my text field created and configured, but it still isn't being displayed on our actual view. I know that a text field doesn't have any kind of inset so I want to put it inside a container view and then I'll position that container at the top of the keyboard.
So first, I will add that new view and call it aboveKeyboardView.
class KeyboardFieldPromptController: UIViewController {
    let aboveKeyboardView = UIView()

    // ...
}

override func viewDidLoad() {
    // ...

    self.aboveKeyboardView.backgroundColor = UIColor.white

    self.textField.returnKeyType = .done
    self.textField.delegate = self
    self.configure(self.textField)
    self.aboveKeyboardView.addSubview(self.textField)
    self.view.addSubview(self.aboveKeyboardView)
}
This is relatively straight forward. I want the container to have a white background so we don't see through to the content below. I also want the return key type to be a done button. Lastly, I need to add the two views to the view controller's view so it's visible.
The last step is to position the views. I do this with auto layout to ensure it works on all screen sizes and types.
First, I want to position the text field inside its container.
override func viewDidLoad() {
    // ...

    var factory = ConstraintFactory()
    self.textField.translatesAutoresizingMaskIntoConstraints = false

    factory.constrain(
        .left,
        ofBoth: self.textField,
        and: self.aboveKeyboardView,
        by: 8
    )
    factory.constrain(
        [.centerX, .top, .bottom],
        ofBoth: self.textField,
        and: self.aboveKeyboardView
    )
    factory.constrain(
        .height,
        of: self.textField,
        to: 44
    )
}
Here I'm constraining it to fill the full height but be inset on both sides by 8 pixels. Instead of constraining both the left and right to be 8 pixels, I like to constrain just one side (the left) and then constrain it to be centered. This makes the other side always match in case I want to update it later. I also constrained it to always be 44 pixels tall.
Lastly, I need to position the container above the keyboard. For that, I need to add my KeyboardConstraintAdjuster and then configure a few things in viewDidLoad.
class KeyboardFieldPromptController: UIViewController {
    let keyboadConstraintAdjuster = KeyboardConstraintAdjuster()

    // ...

    override func viewDidLoad() {
        // ...

        self.aboveKeyboardView.translatesAutoresizingMaskIntoConstraints = false

        factory.constrain(
            [.left, .right],
            ofBoth: self.view!,
            and: self.aboveKeyboardView
        )
        self.keyboadConstraintAdjuster.view = self.view
        self.keyboadConstraintAdjuster.constraint = factory.constrain(
            .bottom,
            ofBoth: self.view!,
            and: self.aboveKeyboardView
        )
    }
}
Here, I'm constraining the container to be full width and then setting up the keyboardConstraintAdjuster to maintain the bottom constraint to the bottom of the view. This will allow it to move up and down with the keyboard as necessary.
Now I want to test it, so I have to update the presentation code.
@objc func edit() {
    let prompt = KeyboardFieldPromptController(
        configure: { textField in
            textField.text = self.label.text
        },
        completion: { text in
            self.label.text = text
        }
    )
    self.present(prompt, animated: true, completion: nil)
}
I want to fill the initial field with the existing text and then update the label with the final text.
When I test it, I see that none of my layout is being performed. As usual, I forgot to activate the constraints. I often forget to do this as well as turning off translatesAutoresizingMaskIntoConstraints. So I add the constraint activation.
override func viewDidLoad() {
    // ...

    factory.activateAll()
}
Respecting Safe Area
Now, I test it out, and it works as expected on older iPhone models with home buttons. However, I notice that it appears too low on models without home buttons.
The problem is, I'm not respecting the safe layout. For that, I'm going to pull out the safeAreaLayoutGuide. I don't want to mess with the aboveKeyboardView position. Instead, I'm going to make it taller to fill up the safe area and inset the sides of the text field to inside the safe area.
The sides are pretty straightforward. I remove the existing text view left constraint and instead use the safe are layout guide.
factory.add(self.view.safeAreaLayoutGuide.leftAnchor.constraint(
    equalTo: self.textField.leftAnchor,
    constant: -8
))
The bottom is a little more complicated. I need two different bottom constraints. The simple one is what is already there, but I need to lower its priority because the safe area will be bigger than it on the modern devices.
let fill = factory.constrain(
    .bottom,
    ofBoth: self.textField,
    and: self.aboveKeyboardView
)
fill.priority = .defaultLow
The other constraint I need is the safe area one.
factory.add(self.view.safeAreaLayoutGuide.bottomAnchor.constraint(
    greaterThanOrEqualTo: self.textField.bottomAnchor
))
This ensures that the bottom of the text field never goes below the safe area. The container will be made taller to make sure that's true.
When I test again, everything is working as expected on both models of iPhones, in both orientations, and with a hardware keyboard or not.
Auto Activating
The only other improvement I want to make at this time is to automatically select the text field instead of making the user tap the text field themselves.
I start by adding a viewWillAppear.
override func viewWillAppear(_ animated: Bool) {
    super.viewWillAppear(animated)

    self.textField.becomeFirstResponder()
}
This gets the job done, but I notice two things when I test it:
- The animation in is funky. The field animates in from the upper left instead of the bottom.
- The cursor is placed at the beginning of the field instead of the end if there is already text.
To fix the animation issue, I wrap the call inside a dispatch to the main queue.
override func viewWillAppear(_ animated: Bool) {
    super.viewWillAppear(animated)

    DispatchQueue.main.async {
        self.textField.becomeFirstResponder()
    }
}
This is already on the main queue, so all this does is move it to the next iteration of the main loop. This way, the layout of the view at the bottom is locked in with the initial presentation before we trigger a second animation presenting the keyboard.
The last step is to set the cursor position to the end of the field instead of the beginning. For that, we have the selectedTextRange property of the text field.
override func viewWillAppear(_ animated: Bool) {
    super.viewWillAppear(animated)

    DispatchQueue.main.async {
        self.textField.becomeFirstResponder()
        let range = self.textField.textRange(
            from: self.textField.endOfDocument,
            to: self.textField.endOfDocument
        )
        self.textField.selectedTextRange = range
    }
}
That's it. If you followed along, it should be working now. If not, you can browse or download my final solution to compare it.
Summary
Overall, this wasn't too bad. The trickiest part by far was respecting the safe area layout, especially when a hardware keyboard was plugged in. My ability to solve that quickly came from dealing with it a bunch in the past.
That also applies to some of the weird animations. That's why I'm writing tutorials like these. To teach you things that I learned with a whole bunch of trial and error.
If you have any questions that you think would be of general interest and worth a blog post, please let me know and maybe I'll write a blog post for it.
 Follow Me
 Follow Me